Sunday, June 3, 2012

Chicken Satay

Satay is one of those gold standard dishes that I tend to judge a restaurant by. I've had some realy horrible Chicken Satay that more closely resembled leather on a stick than actual food (usually found at chinese buffets), and I've had some that still makes my mouth water just thinking about it (such as Sakura's Satay- which I had in Paris last year- shown below).


For me, this recipe falls closer on the scale to Sakura's and a bit more even towards the authentic than even Sakura's, which is not a bad thing at all. I must mention that I gleaned this recipe from yet another cookbook find this past weekend. It's called Street Food, by Clare Ferguson. It's a collection of street food recipes from every corner of the world. I was thoroughly impressed by the gorgeous pictures and rich, varied recipes I found... and I got the book for only three bucks!

I didn't really have any issues with ingredients for the recipe thanks to a trip to the Asian market in OKC this past weekend (other than not having fresh lemongrass stalk or tamarind paste), so I think my dish came out pretty close to the book's. I did lack tamarind paste, so I just left it out of the peanut sauce and added a little bit of peanut butter for some consistency, then when my mixture was still too thin, I brought the sauce to a boil, added about a teaspoon of corn starch, and the problem was solved.

Chicken Satays
1 lb. boneless chicken breast
2 T peanut oil
2 T distilled white malt vinegar (I substituted apple cider vinegar for GF purposes)

-Spice paste-
3 garlic cloves, chopped
4 shallots or 1/2 small onion, chopped
1 T coriander sees, crushed
1/2 stalk lemongrass, finely chopped (I didn't have this, but I did have a Thai spice mix with some in it, so I added 1 t. of that mix)
1 t. ground turmeric
2 small, fresh hot red chilies, finely chopped (optional in my opinion)

-Satay sauce-
1 t. fish sauce, toasted on a piece of foil for 1 minute
1 t. tamarind paste (sold in jars- but I didn't have any, so I added some natural peanut butter instead mainly for consistency)
1 oz. macadamia nuts or peanuts, chopped,
1 T brown sugar
1/2 stalk lemongrass, finely sliced (again, same substitution of spice mix here)
4 shallots or 1/2 small onion, chopped
2 small, fresh hot red chilies, finely chopped (optional in my opinion)
1/2 c canned coconut milk

Cut the chicken breasts into thin ribbons about 1 inch wide, then put pieces into a medium bowl. Chop the spice paste ingredients, mixing them all together in a food processor until it becomes a paste-like consistency (if you need to, add 1 T of water to help the consistency). Heat the oil in a skillet, add the spice paste, and saute until aromatic. Let it cool, stir in the vinegar, then add to the chicken. Marinate for about 20 minutes or up to 2 hours. Meanwhile, soak 8 wooden satay sticks in water.

To make the satay sauce, put the fish sauces in a food processor, add the tamarind paste (or peanut butter in my case), nuts, sugar, lemongrass, shallots or onions, and chilies. Heat the coconut milk in a small saucepan to near boiling point, then add to the processor and puree briefly to form a sauce. Preheat your broiler or light your grill until very hot.

Push the meat onto the sticks, threading it on in waves- then grill or broil or cook for about 3 minutes each side until done. Serve with the satay sauce.

Ratings from the Experts*: Hubby gave this (even lacking some ingredients) a solid 10. Better than 95% of the other chicken satay I've had, I gave it a 9, simply for the fact that it was a tiny bit dry for what I prefer, compared to the satay in Paris which is the best experience I've had.

Friday, June 1, 2012

Pinspiration.


Pinterest has become a new interest of mine. Well... scratch that. It's not just an interest, it's an obsession. There. I said it. *Breathes deeply*. Hello, my name is Jen... and I'm a Pinterest addict.

I can freely admit that I've gone through every one of my pinboards and selected the 'best' cover; I have categorized and recategorized my pins into more and more boards as time goes by. Checking Pinterest as much, if not more than Facebook is not uncommon. My favorite Pinners, like my cousin Tara, who consistently posts some of the best DIY pins out there, Jane Wang (who posts fabulous recipes) and Lauren Conrad (yes... that Lauren Conrad) who has a great eye for fashion and design, pepper my pin boards.  I have three boards for food alone. I have two or three for fashion, and several for home decor, design, and organization. If I'm looking for a specific type of recipe, I check Pinterest first. If I have a vague design idea for furniture but want some more ideas, I check Pinterest. I confess that a lot of thought patterns end in "I should check Pinterest!" these days and frequently I'm met with eye rolls from my husband.

Thus, I am going to start blogging some of the Pinterest projects that are inspiring me in my own household off and on. (I know I'm only adding to the addiction, but really, it can't be helped. It's like the compulsion to scratch an itch...) I'll be posting the inspiration project, then following up with updates on my projects as they come along.

So, without further ado...

I want to take this.... (old beat-up chest of drawers currently being used as my craft supply storage.)


To something resembling this.


My chest of drawers is obviously a lot simpler in design than the inspiration piece and I don't intend on using Eiffel tower artwork in the decoupage, but I have some vary old hymnals that I think would work nicely for the drawer fronts. I'm trying to decide if I should paint the whole dresser the shade below.  I have this shade as an accent piece throughout my living room, but I'm unsure if I want to use such a vibrant color on a piece as large as the dresser... so. I don't know yet. Thoughts?


But regardless, I will post progress pics once I decide what exactly I'm doing to it. I'm excited to see how it turns out and I hope whomever my readers are, that they enjoy the process too!

Thursday, May 31, 2012

Tuna Rolls


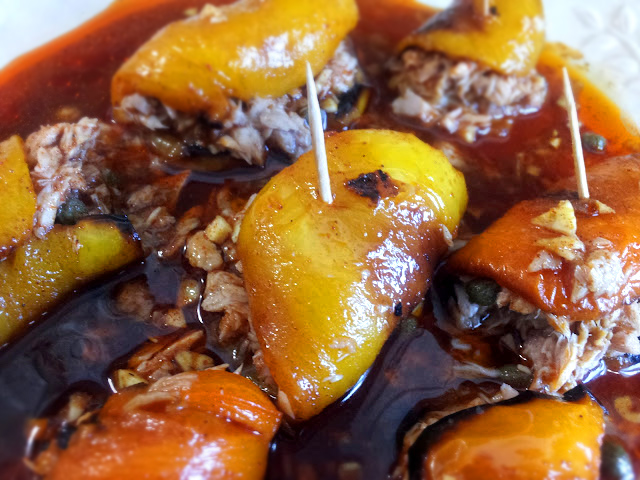
I found this gorgeous new recipe in a book I picked up this past weekend at a half price bookstore during a sale... for a whopping $2!!! Not only are the pictures in this book absolutely fantastic-make-you-salivate-esque, the recipes are inventive and different. It's called Everyday Tapas : A collection of essential recipes, and appears to be put together by Paragon Books with no particular author. Thumbing through it briefly I saw at least half a dozen recipes that I wanted to try immediately, which was enough for me to decide the $2 price tag was totally worth it. This recipe was one of those that popped out at me. I love bell peppers and go through several of them every week... so I'm almost always stocked with some, and I have (or had) about 8 cans of tuna sitting in on my cabinet shelf that I'd been contemplating how to use for the past couple of weeks. As is usual for me, I had to adapt a tiny tiny bit to account for some missing ingredients as well as personal taste. (And yes... that gorgeous photo above really is mine. This dish was so pretty that it was not hard to photograph at all!

Tuna Rolls (as adapted from Everyday Tapas)
3 bell peppers (I used yellow and orange, although the original recipe calls for red)
2 oz. olive oil (was 4 oz. - I cut this in half and didn't notice any difference)
2 T lemon juice
5 T red wine vinegar
2 garlic cloves, finely chopped
1 t. paprika
1 t. chili powder (called for chili flakes- which I don't have)
2 t. sugar
2 T salted capers
10 oz. tuna in water, drained

Preheat the oven to 500 degrees. Slice and deseed the peppers into thirds, coat lightly with olive oil and place on a baking sheet in the oven for 15 minutes, turning peppers frequently until the skin is blackened and blistered all over. When finished, set them aside and allow to cool.

In a separate bowl, whisk the olive oil, lemon juice, vinegar, garlic, paprika, chili powder and sugar together.

When the peppers are cool enough to handle, peel off the skins, then place in the bowl of dressing mixture, making sure all the pieces of pepper are covered and coated, then set in the fridge for 30 minutes.

Next, rinse the salt off the capers and mix with the tuna. Drain the pepper pieces, reserving the dressing. Divide the tuna mixture between the pepper pieces and roll up. Secure the roll with a toothpick. Place the tuna rolls on a large plate or serving platter, then drizzle with the remaining dressing and serve.

Makes approximately 4 servings.


Ratings from the Experts*: 9 very easily. My husband isn't a fan of tuna so it's doubtful he'll even try these, but I loved them. The only things I would change is to add a little black pepper to the mix, and perhaps cut back the olive oil even more or change it to garlic infused olive oil for a tiny bit more flavor.


Tuesday, May 29, 2012

Brazilian Black Bean Stew


I was really in the mood for something flavorful and exotic a few days ago, and I wanted something that combined meat and a fruity, sweet flavor. I did some digging on allrecipes.com and found this recipe. Since I lacked a few ingredients and I can never seem to leave a recipe alone, I made some tweaks to it.

This gorgeous bowl of awesomeness is called Brazilian Black Bean Stew. And it's actually even better as leftovers than the first day of cooking, as I discovered today. The flavors soak through it all and flavor the whole dish to perfection.

Brazilian Black Bean Stew
1 tablespoon canola oil
3/4 lb. chicken sausage, chopped or sliced thin
1 medium onion, chopped
2 cloves garlic, minced
2 cups sweet potatoes, peeled and diced
1 large red bell pepper, diced
1 14.5 oz. can diced tomatoes with juice
1 can Rotel (with green chilies)
1 1/2 cups water
2 16 oz. cans black beans, rinsed and drained
1 14 oz. can crushed pineapple, drained
1/4 teaspoon salt
1/4 teaspoon cumin
pinch of pepper

First, heat the oil in a large cast iron skillet over medium heat, and cook the chicken sausage just enough to warm it. (2 to 3 minutes). Add the diced onion to the skillet, and cook until tender. Stir in the minced garlic, then mix in the sweet potatoes, bell pepper, tomatoes with juice, Rotel, and water. Bring to a boil, reduce heat to low, cover, and simmer 15 minutes, until the sweet potatoes are tender. Next, stir the beans into the rest of the mixture, and cook uncovered until they begin to soften a bit more. Mix in the pineapple, and season with salt, cumin, pepper, and other spices to taste. 

I recommend allowing it to cool for at least 10 minutes before serving.
Makes 6-8 servings depending upon portion size.

Ratings from the Experts*: Me- First night I gave it a 7. It seemed way too tomato heavy and the spices just didn't seem to blend through it all. Today... I give it a strong 9. The flavors had melded together and the tomato did not seem overbearing today at all. It was delicious. The spices were great today, although in the future I think I would increase the cumin to 1/2 a teaspoon and add more than a pinch of pepper... and possibly add some basil to the mix for good measure. Hubby gave it a 7 as well but also agreed that it only seemed to get better as leftovers. I'm thinking somehow this might do even better as a slow cooker recipe? Nonetheless... this is a definite yes to making it again.


A New Beginning...or Rather, an Expansion.


This blog is evolving a little to account for my lifestyle and interests, as cooking is just one of many things I enjoy doing in my free time. Thanks to the rise of Pinterest and many other DIY blogs and sites, my interests in home deco and organization have also been piqued and sent into overdrive lately. I've been on a six month house cleanse, donating, selling, and repurposing about three quarters of the junk, clothes, and general mess that had been clogging every closet in my house and spilling into my idyllic appearance of clean. I have the very last round of craigslist  and donation items set out in the spare bedroom now. My closets are organized and clean. Our attic space junk has been cut to about 20% of the original volume and I can now walk through front to back with zero risk of tripping over some random box of undisplayed art projects or college dorm room decor that had last seen the light of day 9 years ago.

Let me tell you... it is a WONDERFUL feeling to open a door and see everything right there in front of you, to know where everything is, and to be able to use everything that is left. My head feels clearer and I feel much more at peace with our home environment. I don't have obvious things facing me every day now like "I really need to go through that cabinet and reorganize it." There aren't any more broken or orphan phone chargers in the coat closet. I don't have clothes I haven't worn in 5 years or longer any more. That yellow gold jewelry that never suited my skin tone? It's gone too. In place of these random things is a mound of cash in our pocket, a closet that looks neater, drawers that are a little less stuffed, repurposed mason jars that actually do something other than sit empty taking up space in cabinets, and crafts that I've actually used to decorate our house instead of them sitting on a shelf somewhere upstairs for years on end.

I managed to develop a method of getting rid of stuff without the dreaded internal argument.

For example: Well... I did use that doily for Aunt Bertha's party 2 years ago... but will I use it again in the next five years?

Answer: Is the doily currently serving a purpose, or will it serve any purpose in the next six months? How many other doilies do you have? Is there a need to keep all of them especially if they aren't an heirloom or of sentimental value? NO. Repurpose, sell, or donate... or actually USE it. Don't let it sit unused on a shelf.

Those clothes that are either too big or too small or are certified relics yet still hang in your closet? Don't keep them. Donate or sell them. By the time you lose the weight they won't be in style any more anyway. They could be clothing somebody a lot less fortunate than you right now. Instead they are sitting in your closet unworn. Unless you're going to spend time mending, get rid of socks with holes, and clothes that are a little too well-worn as well.

Go through your medicine cabinets and pitch all the expired meds, vitamins, and bandaids that have lost their sticky. Trash those empty shampoo bottles in your shower. (Yes...I'm talking to you). That hairspray you haven't used in five years? Pitch it too.

Check the dates on your non-perishables in those kitchen cabinets too. I had muffin mix in my cabinet that was 4 years out of date. I found old pasta that I can't eat now since I'm gluten free... some of it was out of date too.

The biggest point is, getting rid of things is not an issue of sentimentality, it is an issue of use. Can or will you use it... and be as realistic as possible about those odds.

So step up... do what I did, be bold... and reclaim your house, sanity, and organize! In the future, I hope to share some of the organizational ideas I've picked up on lately as well as some of the recent home decor projects I've completed, so look for updates soon!

Sunday, February 12, 2012

Super Fluffy Peanut Butter Oatmeal Chocolate Chip Cookies


I had a major sweet tooth today and was feeling adventurous, so I whipped these together out of my head. As you can see, I was going for insanely sweet, and I would say that this did it. An unexpected benefit was that these turned out absolutely deliciously FLUFFY... which is kind of a rare thing for gluten-free cookies. My husband agreed they were phenomenal.

Super Fluffy Peanut Butter Oatmeal Chocolate Chip Cookies
1 c creamy peanut butterr
1 c sugar
1 c flour (I used Pamela's GF all-purpose flour, but regular flour will work too.)
1/2 c oats
1/4 t. baking soda
1/4 t. baking powder
1/4 t. vanilla
1/4 c melted butter
2 eggs
1/2 c choc. chips (or desired amount)

Preheat the oven to 350 degrees F. Mix together all the dry ingredients. Add the peanut butter, butter, vanilla, and two eggs and vigorously fold in the wet ingredients until the dough is blended and slightly sticky, but moldable. Form small balls of dough and space evenly on a foiled cookie sheet. DO NOT flatten the cookie balls, this is part of what makes them fluffy. I put the first dozen in the oven as dough balls and they turned out super fluffy. I made the mistake of flattening the second sheet of cookies and they turned out ok, but not nearly as light and fluffy. They don't spread much, so don't get panicky watching them bake. Bake them for 13-16 minutes watching closely so they don't crisp too much. Serve warm. Yields about 24 cookies.

Ratings from the Experts*: 10, 10, 10... for sure. Will definitely make these again!


Wednesday, February 8, 2012

Glazed Pumpkin Pecan Muffins


I've had a sweet tooth all week and yogurt doesn't seem to be cutting it, so I went on search of a decent looking recipe. This is actually a hybrid of many recipes, but all in all it turned out really good even though I didn't know exactly what I was going to do when I started.

Glazed Pumpkin Pecan Muffins
1- 15 oz. can pumpkin
1 box yellow or spiced cake mix (I used Betty Crocker Gluten Free Yellow cake)
1 T cinnamon
2 t. cloves
2 t. nutmeg
3 T chopped pecans

For glaze:
1 1/4 c powdered sugar
3 T milk

Preheat oven to 325 degrees F. Grease a muffin pan and set aside. In a large mixing bowl, whisk together all the dry ingredients: cake mix, cinnamon, cloves, nutmeg, pecans. Once well-mixed, start folding in the entire can of pumpkin until all of the pumpkin is mixed in and the whole mixture is entirely moist.  Spoon by heaping tablespoonfuls into the muffin cups until they are about 2/3 full. Bake in oven for 20-25 min.
Once muffins are done, allow them to cool completely before beginning glaze.

Easiest thing to do is use a measuring cup to measure out the powdered sugar, keep it in the measuring cup, then add a T of milk at a time, mixing well with a fork until the sugar mixture has become a thick, creamy glaze. Drizzle generously over the muffins and then all all the muffins to sit in the fridge for about 20 mins to allow the glaze to set. Devour.

Ratings from the Expert*: 8.75? I couldn't quite give it a 9 since I didn't exactly whip my glaze thick enough. It didn't set quite as well, but I think I really just didn't whisk enough. 2 muffins are already gone. They are delicious. And gorgeous to boot.